Our house has one bathroom upstairs, and we thought it would be better to have  second one downstairs. My husband has been planning this for several months and now that the weather is getting warmer, it’s a nice time to start tearing things down. Our house is 233 years old, so we learned a lot about how people built their homes way back when.

First thing we noticed was all the odds and ends that held together the walls. You won’t see a lot of nice, even 2x4s, but rather an assortment of wood pieces, whatever pieces could be salvaged and used as support while the main beams of the house were nice and sturdy. See where that red leveler is? That wide plank isn’t a support beam, but was probably used as a surface to nail the inside wall to.

Bath_01

Future site of new bathroom. There was no insulation in these two walls, so I stapled large table cloths over the doorways and pretty much avoided using this room all winter

Bath_02

Drainpipe in corner will be covered with drywall. Doorway will be from the porch. One more layer of flooring to be removed.

Bath_03

View from the porch. To the left of the opening is that framed-out drainpipe, door will go here. Coat closet on the right. Door to the kitchen hidden by hanging coats.

I think he’ll work on this over the weekend again, so I’ll post more pics soon…stay tuned!

It’s week 21 of my pregnancy, and I’m starting to feel the weight of the baby right on my bladder, not to mention the occasional muscle spasms which indicate my body “practicing” for delivery, and what I’m guessing is to be some movement of our little brotchen:

3-15-13_19_weeks_c

He’s looking nice and healthy…and yes, it’s a BOY!!!

Here’s proof of the gender:

3-15-13_19_weeks_b

Butt shot with a clear view. :)

Food = Fatigue? I’ve been feeling really tired the past several days, and I wasn’t sure why. Sleep was okay, exercising was okay (when I wasn’t too tired) but I was still struggling to keep my eyes open after breakfast. I decided to change up what I was eating, starting with breakfast. No more peanut butter and toast, even with a cup of calcium-fortified soy moo. Maybe cutting out the wheat would help, at least for breakfast (including sprouted grain breads.)

Muffins_Grain-Free_1

Clockwise from top: coconut biscuit, apple cinnamon raisin, and pumpkin muffin with almond sprinkles.

Grain, Grain, Go Away I came across several grain-free muffin recipes from wellnessmama.com the other day, and boy, are they GOOD! I made three versions already: apple cinnamon (with raisins), pumpkin, and also some coconut biscuits to serve with some buffalo chili we had last night. They all were delicious, and since they were grain free it was a great way to see if grains–including my sprouted wheat toast–may have contributed to my all-day fatigue.

The Results were Inspiring Well, I certainly didn’t feel like taking a nap after eating those delicious muffins, so maybe I’m on the right track. More protein than your average muffin, low in carbs, and they contains healthy fats. It’s wonderfully moist and tastes even better cold–and not many muffins can brag about that! So taken was I by wellnessmama’s muffins, I wanted to make a chocolate version. Following her cinnamon apple muffin recipe, I made a few modifications. The result: a light, sponge-like chocolate cake-muffin dotted with melted semi-sweet chocolate chips. It’s makes a delicious snack, or even a bonus to your already healthy breakfast. Now who’s ready for a grain-free muffin?

Muffins_Grain-Free_2

Moist cakes with a slightly spongy texture and rich chocolate flavor.

Double Chocolate Muffins inspired by wellnessmama’s grain-free Apple Cinnamon Muffins

Ingredients:

1/2 cup coconut flour
2 tablespoons cocoa powder
3/4 teaspoon baking soda
1/2 teaspoon instant espresso powder (such as Medaglia d’Oro)
1/2 teaspoon salt
4 eggs
3/4 cup applesauce
3 tablespoons agave syrup
1 teaspoon vanilla extract
1/4 cup coconut oil, melted
1/2 cup semi-sweet chocolate chips (gluten-free ones such as Enjoy Life, if you’re allergic)

Directions: Preheat oven to 400. Coat 12 muffin cups with cooking spray, set aside.

In a large bowl, whisk dry ingredients (not chocolate chips.) Push to the sides, making a well in the center. To the middle of the bowl, add eggs, apple sauce, agave syrup, vanilla, and coconut oil. Blend wet ingredients on medium-high speed for a few seconds, then incorporate dry ingredients by “grabbing” flour mixture from the sides with the beaters and blend until combined. Using a rubber spatula, stir in chocolate chips. (NOTE: batter may be liquidy, so to keep chocolate chips from sinking to the bottom, sprinkle on muffin tops after baking for 2 minutes–batter will firm up–then return to oven and bake for the remaining time.)

Using a 1/4 cup scoop, fill 12 muffin tins. Sprinkle top with extra chocolate chips, if you like. Bake for 12-15 minutes or until toothpick inserted into center comes out with a little bit of a moist crumb. Cool on a wire rack.

You can store these muffins in an airtight container in the fridge for up to 5 days, or tightly wrap in foil and freeze for up to 2 months.

Be sure to visit www.wellnessmama.com for other delicious recipes as well as tips and ideas on making homemade cleaning products, beauty treatments, and other information on easier, healthier living.

After two months of doing a lot of lounging and no exercising, I decided to get some prenatal DVDs to help get me back into shape. I know I couldn’t go back to “Insanity!” and could do a little bit of Jazzercise, but it’s best to get something specifically for expectant mothers.

Here are three prenatal DVDs I got through Amazon. I looked for reviews that said they got a good workout, had fun, and felt the exercises were safe. I also wanted something good for beginners,  and (though this may not come to mind when selecting an exercise DVD,) choosing DVDs that had good quality camera work can make a BIG difference in how you enjoy your workout. You want to clearly see and hear the instructor as well as music in the background. I also wanted something affordable, so weeded out the ones that were too pricey. (Like a good wine, you CAN find something good for under twenty bucks! ;))

What to Expect When You're Expecting - Workout

What to Expect When You’re Expecting
$12.46 on Amazon.com

Why I got it: cardio

The Good: easy cardio for 2nd trimester that gives you a good workout without leaving you exhausted. Strength portion is easy to follow for beginners and intermediate levels (you’ll need a pair of 2lb-3lb weights.) Stretching is easy and relaxing. Instructors remind you to watch your form, breathe, and don’t overdo anything.

The Bad: Cardio portion: some of the cues are not early enough, a couple times the instructor starts off on the left rather than right or misses a step. Strength portion:  Switching between moves too quick, and I think she could hold the poses for a few seconds longer. There are three ladies exercising, one instructor and two mommies, and they all have headset mikes. During the cardio section the mommies get kinda giggly, and it gets distracting after a while. But, I guess it’s good that they’re having fun. :)

The Awesome: customizable workout! You can select which segment you want to do in any order. The first day I chose all 3 cardio workouts and the cool-down. There’s a brief 30-second narration in-between by the author of “What to Expect When You’re Expecting,” a good time to get a drink of water or get out your yoga mat for the cool-down segment.

Amira's Belly Dance & Yoga For Pregnancy Prenatal Exercise

Amira’s Prenatal Belly Dancing and Yoga
$15.89 on Amazon.com

Why I got it: for fun (belly dancing moves)

The Good: Workout consists of: 5 segments: yoga stretching, strengthening, belly dancing, labor exercises, yoga cool-down stretch. In addition, there is also some narration and brief cutaways on belly dancing and yoga before and during the segments, which I found helpful in learning more about the importance of what yoga and belly dancing is all about, as well as the important role it plays in easing your pregnancy.I love her gentle demeanor! She does a voice-over during the routines, so it’s easier to  follow along with her movements. She shows you alternative moves and cautions against certain moves if you are 30 weeks or more into pregnancy (I forgot how far along she is, but she also looks about 30 weeks pregnant, maybe even more.)

The Bad: The only bad thing I have to say is that skipping to the next section takes a few seconds too long…I think I was just too anxious to get to the routines!

The Awesome: I really like the music she uses in the background. Bonus features include an intro to yoga and belly dancing by Amira, so you get to learn a little about what you’re doing and why. There’s also a short clip with her “spoofs”, kinda cute! She also changes clothes for each segment, and during the belly dancing routine she wears some nice jewelry and a sash that makes it more like a belly dancing outfit (wish I had one!)

Results: after 2 workouts focusing on just warm-up, strengthening and cool-down, I had NO problems with having tight hip flexors at night! Sometimes I’d wake up and massage my hips or back until the muscles relaxed and I could fall asleep again. Her stretches were so incredibly helpful, I wish I knew about this years ago.

Jane Austin Prenatal Yoga DVD

Jane Austin’s Prenatal Yoga
$17.95 on amazon.com

Why I got it: focus on yoga

The Good: Jane is not pregnant in this video but has 4 mamas working out with her. She has a very pleasant and calming voice, is friendly and does a good job of explaining the moves both in technical terms and in fun terms (in reference to doing hip circles she says, “Babies don’t like ‘Buns of Steel’, they like juicy hips!”)

The Bad: It’s a 63-minute yoga session, and it would be great if there were a 30-minute option.

The Awesome: Results, of course! It really helps with back aches and improving flexibility.


Any expectant mamas out there with a favorite workout? How about a pre- or post-workout snack?

ahhh...heavenly!

ahhh…heavenly!

A few days ago I got one of those warehouse-sized 4-flavor packs of cupcakes–and I had no problem putting them in my pregnant belly. There were coconut, red velvet, carrot and double-chocolate cakes, all deliciously moist, but topped with incredibly sugary frostings. Though they look almost too pretty to eat (almost) and I love variety packs of anything, making my own cakes give me the option of using more of the healthy ingredients and less of the not-so-healthy ones. I already have a delicious recipe for carrot apple ginger cake, so all I needed was a nice frosting to go with it.

Lemons to enhance and balance
I love using lemons in a lot of dishes, sweet or savory. Store bought cream cheese frosting is pretty sweet, so I used only a tablespoon of powdered sugar, left out the butter and relied on vanilla soy milk to add some flavor. The lemon juice rounded out that sugar and gave it a nice tarty sweetness. Adding lemon zest or orange zest made it fragrant and just about perfect!

My internet was down all day Tuesday, so what better time than to try this out? Enjoy!

Carrot apple ginger cake topped with creame cheese frosting and orange zest

Carrot apple ginger cake topped with creame cheese frosting and orange zest


Cream Cheese Frosting with Lemon or Orange Zest
You can also substitute goat cheese for the cream cheese.

Ingredients:
8oz block 1/3 less fat cream cheese, softened (about 20 min at room temp.)
1 tablespoon powdered sugar
1 tablespoon vanilla soy or almond milk
juice of 1 lemon, about 2-3 tablespoons
zest of 2 lemons or oranges, reserving 1 tablespoon

Directions:
In a small bowl, use a fork and mash cheese with powdered sugar. Stir in soy or almond milk and lemon juice, combine until smooth. If still lumpy, let sit for 5 minutes and stir again. Stir in lemon or orange zest. Spread frosting over cakes, top with reserved fresh lemon or orange zest.

At 17 weeks pregnant I’m trying to be more conscious of choosing foods that have more nutritional bang for your buck. Of course, not everything that goes down my gut is 100% good-for-you food (I like Burger King’s breakfast combo: bacon & egg muffin sammies with those golden hash brown coins…yummm!) but I do try and make the extra effort when it comes to home-prepped meals, particularly with breakfast.

Why Shimmy When You Can Shake?
During my second month of pregnancy I started eating tons of fruit high in Vitamin C (pineapple, oranges, strawberries, kiwi) and drinking lots of ice water, which I never really enjoyed (it had to be hot or room temp with lemon. For some reason, my stomach didn’t like plain/cold water.) Seeing how I needed more water and a lot of nutrients for the growing baby, I figured the best way would be to introduce shakes into my diet. They’re easy to prepare, you can make a big batch to last several days, and the flavors are delicious!

Natural (Ingredient) Selection
First off, I know dairy is not my friend. Milk bloats me up and makes me tired, so I use either soy or almond milk or both  (NOTE: almond milk has no protein, so consider adding a protein boost of some kind when making your breakfast shakes.)

Next, I like the versatility tofu. After doing the “How to Tofu” challenge in October, I learned quite a bit about this food, and learning that it contained plant estrogens that may help with hot flashes was what I needed to combat my night sweats. (waking up at 2 a.m. in a 55 degree bedroom drenched in sweat is no fun, because as soon as that cold air hits you–brrr!)

Of course, shakes have to be nice and thick. Lots of you may have enjoyed Overnight Oats where you soak your oatmeal in milk in the fridge overnight and eat it for breakfast the next morning. Adding a bit of oatmeal to your shake will do a nice job of thickening it up, especially if you let it sit for a day or two.

Finally, I needed some flavor. Chocolate? You bet! Orange? Of course! Berries? Fiber- and vitamin-rich, how can you go wrong? But don’t stop there, you got peanut butter, banana, peach, coconut, pineapple, vanilla, apple, passion fruit, pumpkin…just think of those delicious frozen yogurt flavors and you’ll come up with something creative and delicious!

The Results?
Thick, creamy, flavorful, and filled with lots of good stuff for you and your baby (if you got one in there!) These shakes are around 300 calories each and I try to make it so you get 10 grams of protein in per serving.

Basic Tofu Shake Mix
Incredibly easy!

1 box Mori-Nu Silken Lite Tofu
2 tablespoons light agave syrup
3 tablespoons (1/4 cup) oatmeal
12-16 oz light vanilla soy milk
4 oz coconut milk (or use more soy milk)

Directions: Add everything to a blender and mix on medium speed until combined. Use one of the flavor variations below or make your own. Refrigerate unused portion for up to 5 days.

Now this shake says, "Good morning!"

Now this shake says “Good morning!”

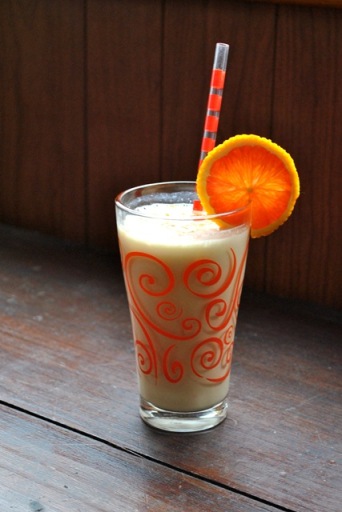
Orange Bang Protein Shake
Reminiscent of those whipped fruit drinks served at gas stations and Orange Julius’s everywhere!

Ingredients:
Half recipe of tofu shake mix (recipe above)
2-3 tablespoons frozen concentrated orange juice
½ scoop vanilla protein powder (I use Vitacost Soy Protein Powder, vanilla flavor)
zest from 1 orange (eat the orange after zesting, it’s good for you!)
Crushed ice
additional water to thin

Directions: Mix everything in blender on medium speed until combined, adding additional water to thin, if necessary. Pour into glass and enjoy.

Mixed Berry Shake
Fresh and fruity, but watch out for seeds if you’re using raspberries or blackberries!

Ingredients:
¾ cup frozen mixed berries
Half recipe of Tofu shake mix (recipe above)
additional water or vanilla almond or soy milk
additional agave syrup or stevia

Directions: Add frozen strawberries or mixed berries to blender FIRST and blend on medium speed until chopped finely, turning off motor and scraping down sides as necessary. Add tofu shake mix and blend until combined, thinning with water or almond or soy milk. Pour into glass and enjoy.

This shake gets its thickness from tofu and oatmeal!

Orange zest is perfect to brighten up the heavier chocolate flavor.

Chocolate Orange Protein Shake (my favorite!)
I love letting this sit in the fridge for a day or two because it gets extra thick

Ingredients:
Half recipe of tofu shake mix
¼ cup unsweetened cocoa powder
¼ teaspoon cinnamon
¼ teaspoon instant espresso powder (optional)
Zest of 1 orange (eat the orange after zesting, it’s good for you!)
additional vanilla almond or soy milk
additional agave syrup or stevia

Directions: add tofu shake mix to blender and start on low speed. Open chute and add cocoa powder through zest. Add almond or soy milk to thin out and sweeten with additional agave syrup or stevia, if necessary. Pour into glass and enjoy.

So what’s your favorite way to shake up your breakfast and snacks?