Hi, folks! I’ve been away for quite some time, mostly because the third trimester of pregnancy has sapped my energy and creativity in the kitchen. I apologize for the long silence, and most likely won’t be posting any new recipes until after the baby arrives.

7-5-13_35_weeks_1_day

Me at 35 weeks.

I hadn’t realized how tiring pregnancy is, especially now at 37 weeks! My garden is full of weeds, I don’t want to cook, and grocery shopping isn’t so much fun, anymore. All my plans to prepare frozen meals and keep healthy snacks on hand have gone out the window–I just don’t care at this point, I just want to have the baby, already!

Last month we were invited to a neighbor’s for barbecue and wanted to bring something you’d normally see at Hawaii get-togethers. I asked my sister for her Mochi Cake recipe, thinking desserts are a good way to introduce new foods to people. I make a chocolate version for those of you that want to give it a try, and either recipe will yield a chewy, spongy mochi cake that’s a nice change of pace from sheet cakes or brownies.

I don’t think our neighbors have ever had anything like it before, and everyone seemed to enjoy both flavors of mochi cake. It’s gluten-free and, if you use coconut oil and water instead of milk, dairy-free, too!

I didn’t take pictures of the dessert itself, but here are pictures I got off the Internet of some of the specialty ingredients:


Mochiko (sweet rice flour, gluten-free), frozen shredded coconut, instant espresso powder.

Mochi Cake

Ingredients:

4 C mochiko (1lb box)
3 C sugar
3 tsp baking powder
1 C frozen shredded coconut (DON’T use the dried stuff you find by the boxed cake mixes, totally different taste and texture!)
6 T melted salted butter (if using unsalted butter or coconut oil, add 1 tsp salt)
1 14 1/2 oz. can coconut milk + water, milk or cream to make 2 cups
4 large eggs
2 tsp vanilla

Directions:

Mix together: dry ingredients
In a separate bowl, mix remaining ingredients then pour into dry mix. Stir until well combined.

Pour into pregreased 9×13″ pan and bake for about 45 minutes at 350º.

Cool, cut into small squares or rectangles (I like rectangles, easier to bite!) and place in paper muffin liners to serve.

Keep uneaten portions in an airtight counter for up to 2 days.

Double Chocolate Mochi Cake

Ingredients:

4 C mochiko (1lb box)
3 C sugar
1/2 c unsweetened cocoa powder
1 tablespoon instant espresso powder (such as Megdaglia d’Oro)
3 tsp baking powder
1/2 cup frozen shredded coconut, defrosted (DON’T use the dried stuff, totally different taste and texture!)
6 T melted salted butter (if using unsalted butter or coconut oil, add 1 tsp salt)
1 14 1/2 oz can coconut milk + water, milk or cream to make 2 cups (can find it at some supermarkets or Asian store)
4 large eggs
2 tsp vanilla
3/4 cup semi-sweet chocolate chips

Directions:

Mix together: dry ingredients

In a separate bowl, mix remaining ingredients then pour into dry mix. Stir until well combined. Stir in chocolate chips OR pour batter into pan and sprinkle chips on top.

Pour into pregreased 9×13″ pan and bake for about 45 minutes at 350º.

Cool, cut into small squares or rectangles (I like rectangles, easier to bite!) and place in paper muffin liners to serve.

November 8, 2011 was our last day living in Hawaii.

My husband and I packed our two cats in their carry-ons, made sure we had their paperwork for the plane, got our luggage and left our 600-square foot apartment in the middle of Honolulu for good.

Bathroom on the left by the TV, kitchen (out of the picture) on the left. Cozy place for two adults and two cats.

Balcony and kitchen. Sammy likes the warm air from the wine fridge. :)

We had been married for about a year and a half and our plan was to purchase a home on Oahu. Though we tried to secure a couple of homes, it just didn’t work out.

We looked at a condo deep in Wahiawa valley:

2 bedroom condo with balcony, about 1,000 sq ft.

A tiny plantation house near Lake Wilson, also in Wahiawa:

Old plantation house w/separate studio, both about 600 sq ft each. See how close you are to your neighbor?

We were also in escrow for about ten months for a house in ‘Ewa Beach, but problems with the title and mortgage company had to be addressed in land court, and that prevented us from taking that last step into ownership.

When it seemed that nothing was working out, we decided to move and find a home elsewhere. We visited my sister and her husband in upstate New York and really loved the area, so that’s where we decided to move the first week of November. For the first 4 months we lived in a studio above a garage in a tiny little town called Deposit.

Our rental car and rental home, about 600 sq ft. of the top floor. Bottom is storage for the owners.

There’s a lot I had to learn about living in a colder climate, like driving in the snow:

My husband didn’t let the lack of a garage stop him from working on the car:

Who needs a garage??!!


Although we started looking at homes while we still were in Hawaii, we were now able to see listed properties in person. There were a few that looked promising, but we happened across a lovely farmhouse that was in a great location and going for a great price!

My husband & the home inspector, Dec. 2011.

After a long wait we finally purchased our home in March and were moved in by April. Along with the beautiful house and property, we also got the lady of the house, Trixie:

Trixie

We started doing some home improvement projects, both inside and outside:

My outdoor project: stone steps going down to the creek.

Ripping out the old ceiling in the dining room.

My husband working on the plumbing.

But in addition to renovations, we also had a couple of get-togethers:

My husband’s birthday dinner: Thanksgiving in July!

And received our first official guests:

My in-laws visiting from Germany.

New York is great, but I miss my family:

Always lots of food at my parents’ house, especially when my two uncles stop by with their own dishes (pork ribs, smoke meat, poke, sushi, etc.)

and having friends over for dinner:

Christmas Eve dinner with friends at our apartment in Honolulu.

But I prefer the weather and changing seasons in Upstate New York over the daily dose of sunshine. Granted I’ve only lived here for one year, and the first winter experience has been one of the most mild ones in the area, so maybe the lady at the Post Office was right in saying, “After a few years, you’re gonna MISS Hawaii!” I really do love it here, and my husband does, too. The people are nice, the weather is great, we live far enough away from the city to have peace and quiet, but close enough to head into town when we feel like it. :)


For those who haven’t tried haupia, this dessert will be deliciously different!

For those who enjoy coconut, or sweet potatoes, or both, this dessert may very well be something for you to try out. Haupia is a firm coconut pudding made with coconut milk, water, corn starch and sugar. Very simple recipe, easy to make, and very popularity in Hawaii. You can easily find haupia in the form of pies, layered puddings or in a small packet of powdered mix that you can just add some water, chill for a few hours and it’s ready to eat. And, of course, you will no doubt come across little paper trays of chilled haupia squares at luaus or Hawaiian food eateries.

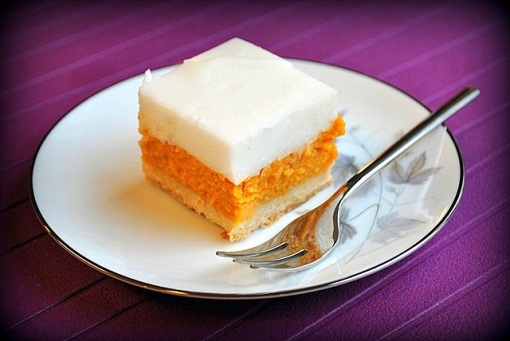
Sweet Potato Haupia Pie combines the cool, silky texture of haupia; a rich yet light layer of Okinawan sweet potato filling; and a crumbly shortbread crust usually sprinkled with toasted macadamia nuts.  The haupia lightens up the dessert, giving it a refreshing yet creamy taste, unlike that of a regular whipped topping (which can be added on top of the haupia, if you like!)

I made my own version (used regular sweet potatoes, no Okinawan ones at the market) and admit I couldn’t wait the allotted time to eat it, so my haupia was a bit runny and the flavors not quite developed. Thankfully, I made two pans, so was able to get you a nice photo of this wonderful dessert the next morning. The gluten-free crust is an excellent choice for this recipe. The texture is very light and crumbly, and the addition of coconut and toasted macadamia nuts gives it an extra crunch.

This is a three-step process: baking the crust, making the filling, and chilling the pie with the haupia topping. Be sure to make the haupia after the pie has cooled since it will set up quickly. And though the recipe is for a pie, for convenience I baked it in a square pan.
HAUPIA SWEET POTATO PIE (Gluten-Free)
Makes one 8″x8″ pan, double recipe for 13″x9″ pan

Coconut Crust, Gluten-Free (based on “Tart Shell Crust” recipe from Gluten-Free Baking Classics):

1 cup Brown Rice Flour Mix (2 parts brown rice flour, 2/3 parts potato starch, 1/3 part tapioca starch)
1/4 cup granulated sugar
3/4 teaspoons xanthan gum
5 tablespoons cold unsalted butter, cut into pieces
1 teaspoon vanilla extract
2 tablespoons toasted, unsalted macadamia nuts, chopped (optional)
2 tablespoons unsweetened coconut flakes

Directions:
Preheat oven to 350 degrees. Position rack in center of oven. Spray an 8″x8″ square cake pan with cooking spray, set aside.

In a food processor or large mixing bowl, combine flour, sugar and xanthan gum. Add butter and mix (or pulse, or cut with pastry cutter) until crumbly. Add vanilla and mix well. Add macadamia nuts last, if using, and stir just enough to incorporate into dough. Mixture will be sandy, not sticky. Gently press mixture into bottom of square pan. Sprinkle unsweetened flaked coconut on top and press into crust.

Bake in center of oven for about 16-18 minutes or until golden. Set aside while you make sweet potato filling.

Sweet Potato Filling: 

2 cups baked or boiled sweet potato, cooled and skins removed (about  5)
1 egg
1/4 to 1/3 cup sugar
1/2 teaspoon kosher salt or 1/4 teaspoon table salt
1 teaspoon vanilla extract
1/2 cup lowfat soy milk

In a large mixing bowl beat sweet potato to break up, just for ten seconds (potatoes are already very soft.) Add egg, sugar and salt, beat to combine. Slowly add vanilla and soy milk. Mix well, about 1 minute.

Pour sweet potato mixture into prepared crust and bake for 30-33 minutes or until surface begins to brown. Remove from oven and cool on wire rack for about an hour before making the haupia topping.

Haupia Topping (modified from ‘Ono Kine Grindz):

1/3 cup sugar
1/3 cup corn starch
1 can (13.5 oz) coconut milk
1/2 cup water

In a mixing bowl, combine sugar and cornstarch. Add water, mix well. Set aside.

In a medium saucepan, pour in coconut milk and heat on medium high for about 2 minutes or until heated through. Stir cornstarch-sugar-water mixture to ensure everything is mixed well, then add to coconut milk. Stir constantly with wooden spoon or heatproof rubber spatula until mixture starts to thicken, about 5-7 minutes (be sure you scrape the bottom of the pot.) Remove from heat.

Pour haupia mixture evenly onto sweet potato filling. Let sit on counter for about 15 minutes to cool off a bit. Make room in fridge so there’s plenty of room for air to circulate around the pan (I even turn down the temperature, normally set to 4, I make it colder to 6.) Chill at least 4 hours, but overnight is best. Cut into 16 squares.